EdTrekkers
Taking Professional Development to New Heights
Wednesday, June 26, 2024
Friday, August 18, 2023
Target Audiences: Google Workspace Admin
Now Google Workspace Admins can set up 'target audiences' to streamline sharing and chats. Target audiences provide users with another way to share their item that will also help improve the security and privacy of data by reducing potential 'oversharing' and make it much easier for users to share to the appropriate audience! You can set up target audiences for both Google Drive and Chat. Here's how:
Create target audience
- In the admin panel, go to Directory>Target Audience
- Enter a name and description for the target audience.
- Select 'Create'
 |
| Enter a name and description, then select Create. |
Add members to the target audience
- Go to Directory>Target Audiences
- Select the name of the target audience
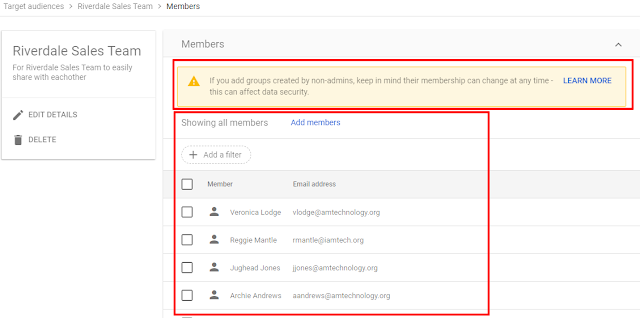
- Select Members>Add Members
- Add groups or individuals (if you add non-admin created groups, membership can change and affect security). If you are concerned about security, add admin groups only or individuals.
 |
| Select Target Audience>Audience Name>Members>Add Members |
Apply Google Services
- Go to Directory>Target Audiences
- Select Apply Google Service>Drive & Docs
- or go to Drive & Docs from the Apps Menu
Set General Settings for File Sharing with Drive & Docs
- Select the parent organization unit for the target audience
- Select 'Target Audiences'
- Select 'Add Target Audiences'
- Select the audience you want to add (create option is here as well).
- Select SAVE.
User Share Settings in Target Audience
Final thoughts
Monday, September 13, 2021
Google Workspace Admin: Allow Access to Google Classroom from Other Domains
A quick post today, but really important one. So often we hear of updates to Google Apps and just take it for granted they will work. Unfortunately, many times a 'feature' doesn't work properly because it requires a modification in the Google Workspace ADMIN panel. Google Classroom has become more widely used for professional development and training. Teachers are enrolled in classes at outside colleges and universities that are teaching with Google Classroom. Many districts have students coming in from other schools for only a few classes. This means that being knowledgeable of HOW to configure Classroom to allow users to join from outside your domain is very important!
It requires that the Admin Settings in Classroom be modified to do this:
- Sign into admin.google.com
- Select Apps
- Select Google Workspace>
- Select Classroom
- Select Class settings.
- Select the EDIT icon. There you will find the options to modify access for those who can join classes in your domain and what classes users in your domain can join.
Below is a video that demonstrates the process.
About EdTrekkers
Google Workspace for both business & education as well as other educational topics. Please check out what we have to offer at edtrekkers.com. If you would like to inquire about professional development, email info@edtrekkers.com
Thursday, September 9, 2021
Create a FlipGrid and Post to Classroom - Fast & Furious for Beginners
The school year is underway and many teachers are setting out to take their skills to the next level and try new ways to engage with students.
FlipGrid is an EXTREMELY popular and versatile too! Communication, community, differentiation, UDL - so many great reasons to use it!
I have many teachers who prompt me with questions about how to invite students, how they access, etc. This post with the accompanied video show how to create a Group (your class), invite students, and share the topic to classroom so they can access. These are the parts that teachers who are new to FlipGrid struggle with. Creating posts and viewing are never a problem and student seem to NEVER have trouble posting, especially with the video effects!
Don't second guess yourself! Tell your students it is your first attempt and you want to work through it WITH them the first time. Show them how it is posted, demo a response and then see how they do. Have a back up plan if you run into a SNAFU. Do your best and forget the rest! You will BE SO GLAD that you took the time to do this. There will be countless ways you can leverage FlipGrid that will make your classroom a happier place and believe it or not, make many things more fun and easier for you!
Recapping the steps below:
- Sign up for an educator account at info.flipgrid.com
- Once you are signed in, select +Group to create a group.
- Name the Group (i.e. name of your class).
- Invite students from your Google Classroom by select the Classroom icon and 'sign in with Google' to sync your teacher account with FlipGrid. This allows your Flipgrid to identify who is in your class
- Select the class that you want to invite.
- Return back to the main screen.
- Use the introductory topic or create a new topic. We don't cover the nuts and bolts of this now, most teachers don't struggle with this.
- Select the 'arrow' (share option) and copy the link.
- Go to your Classwork page in Google Classroom
- Create an assignment (add title and description, due date, assign topic etc as you see fit).
- Add the link to the assignment and post.
- Be sure to tell students to share the LINK / URL to their response from FlipGrid when they submit the assignment.
Wednesday, September 8, 2021
Google Workspace Admin: Set up GMail Compliance Footer
Privacy is one of the biggest concerns for any technology admin no matter what the organization. Increasingly, I am asked basic questions about configuring the Google Workspace Admin panel and here is one of the most basic and popular email 'security' settings.
Today's topic is an easy fix that many admin's already have well established, but for those of you with it on your 'to do' list, I will share with you how to set up that footer for all organizational emails called the 'Confidentiality Disclaimer.' These disclaimers often read something like this:
CONFIDENTIALITY NOTICE -- This email is intended only for the person(s) named in the message header. Unless otherwise indicated, it contains information that is confidential, privileged and/or exempt from disclosure under applicable law. If you have received this message in error, please notify the sender of the error and delete the message. Thank you.or
The Right-To-Know Law provides that most e-mail communications, to or from SAU XYZ employees regarding the business of the School District, are government records available to the public upon request. Therefore, this e-mail communication may be subject to public disclosure. This e-mail is intended solely for the person or entity to which it is addressed and may contain confidential and/or privileged information. Any review, dissemination, copying, printing, or other use of this e-mail by persons or entities other than the addressee is strictly prohibited. If you receive this e-mail in error, please notify the sender immediately and delete the material from any computer. For information about SAU#XYZ, visit sauxyz.xyzThis is a practice that has been considered 'best' for years yet you can always find a debate on whether or not has any legal weight, if it is effective or essentially ridiculous. For most of us, we see that is as simple as due diligence or an effort to protect privacy. It's also easy. I'll just show you simply how to add it.
Before you begin, make sure you have your email disclaimer drafted and approved by administration. Use the boiler plate above or you can find resources like these by doing a simple search.
1. Sign into your Admin Panel
2. Select Apps from the Dashboard
3. Select G Suite
4. Select GMail
5. Select Advanced Settings
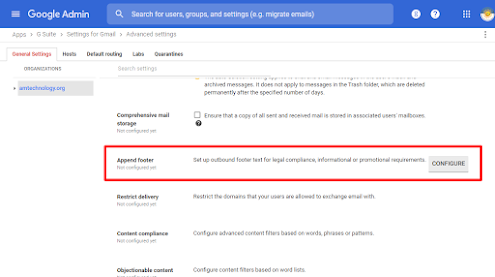
7. Scroll to the 'Append Footer' section, hover and select 'Configure'
Tip: Whenever I have trouble finding what I am looking for on a page in the admin panel, I use CTRL + F to search for the term. It works like a charm!

8. Name, add, edit & save.
9. Edit or Copy to Another OU
Thursday, September 2, 2021
New! Age Based Access Settings in Google EDU Admin Console
Most EDU domains are set up with organizational units that clearly separate students from adults so this change is easy to update. If your under and over 18 accounts are not already in separate organizational units you will need to do that first or set up an over18 group.
Account Settings for Over 18
To complete the steps for setting age based access settings:
- Log into admin.google.com
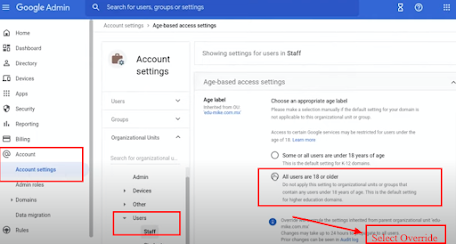
- Select Account
- Select Account Settings
- Scroll down to 'Age Based Access Settings'
- Select the OU that is 'over 18' such as STAFF or TEACHERS.
- Select All users are 18 or over
- Select 'Override'
- Repeat as needed for all over 18 groups.

Additional Services for Over 18
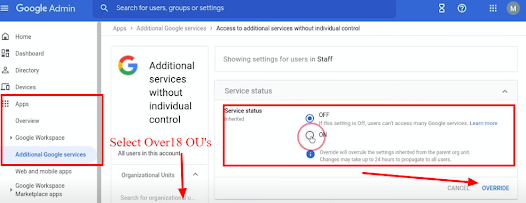
- Select Apps
- Select Additional Google Services
- At the top you will see a notification 'Access to additional services without individual control for all organizations units is turned OFF.
- Select 'Change'
- Select your Over 18 Organizational Units
- Change Service status to 'On'
- Select 'Override'
Creating Over18 Group
- Select Directory
- Select Group
- Select 'Create Group'
- Name it '18Older'
- Set permissions
- Group Members (deselect View members, View conversations & Publish posts)
- Deleselect 'Contact Owners' under 'Entire Organization'
- Set Who can Join to 'Only Invited Users'
- Set the 'Allow members outside your organization' to OFF
- Add your members to the Over18 group (Select group & select the ADD button)
Questions
-
The school year is underway and many teachers are setting out to take their skills to the next level and try new w ays to engage with studen...
-
Privacy is one of the biggest concerns for any technology admin no matter what the organization. Increasingly, I am asked basic questions a...


